
There are multiple methods of MFA that can be established: Okta Verify App, USB Security Key, and Google Authenticator. The best way to move from one device to another is to have multiple methods established before beginning this process.
NOTE BEFORE PROCEEDING: Phone Number / SMS verification is no longer supported. If this method is currently set up, it will need to be removed. Ensure you have at least one other MFA method established before removing SMS.
1. Make sure you have at least two MFA options configured for your account on your old device (See: Add or Change your MFA methods)
2. Login to weblogin.usi.edu with your old device
3. Click the three dots in the top right
4. Click Settings
5. Click Edit Profile
6. Enter your password and click verify
7. Verify your login with one of your MFA options
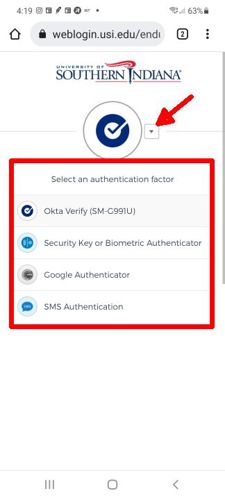
8.Use the Drop Down to Look at the list of MFA options and note which ones you have configured
8.1 Configured MFA options will have a "Remove" button next to them
8.2 If you don't have more than one MFA option configured, you will have only one MFA option with a "Remove" button next to it. If that is the case DO NOT CLICK THE REMOVE BUTTON until AFTER you have configured another MFA option on your new device.
9. Choose one of your configured MFA options to remove from being configured with your OLD device and click the "Remove" button.
9.1. Preferably choose the MFA option that you don't use as often; your backup MFA option
9.2. The button next to the MFA option that you removed will change to "Setup"
10. On your OLD device, open the app that you just removed the configuration for on the Okta website and delete the account for weblogin.usi.edu that is associated with your USI email address. If it is the ONLY account being managed by that app and you don't use that MFA app for any other service (like your bank or for social media), you can just uninstall the app from your OLD device.
10.1. Instructions for removing an account from an MFA app vary depending on the app. You can do a search for "remove account from [name of app]" on Google and find instructions
11. If the MFA option is an App like Google Authenticator or Okta Verify, install that app on your NEW device.
12. In Okta (weblogin.usi.edu), click on the "Setup" button next to the MFA option that you just removed in order to configure it for your NEW device.
13. Follow the onscreen prompts to configure that MFA option on your NEW device.
14. When you have successfully moved an MFA option to your new Device, you can now start moving any other MFA options to your new device. Make sure to ONLY remove and configure MFA options that you haven't moved already.
14.1. There is NO indication on the Okta website (weblogin.usi.edu) for which MFA option is configured on which device. You will have to keep track of this yourself during this whole process.
15. On the Okta website, note another MFA option that you have not moved from your OLD device to your NEW device and choose the next one to walk over to the NEW device.
16. On the Okta website, choose one of your configured MFA options to remove from being configured with your OLD device and click the "Remove" button.
17. Just as before, on your OLD device, open the app that you just removed the configuration for on the Okta website and delete the account for weblogin.usi.edu that is associated with your USI email address. If it is the ONLY account being managed by that app and you don't use that MFA app for any other service (like your bank or for social media), you can just uninstall the app from your OLD device.
18. If the MFA option is an App like Google Authenticator or Okta Verify, install that app on your NEW device.
19. In Okta (weblogin.usi.edu), click on the "Setup" button next to the MFA option that you just removed in order to configure it for your NEW device.
20. Follow the onscreen prompts to configure that MFA option on your NEW device.
21. When you have successfully moved an MFA option to your new Device, you can now start moving any other MFA options to your new device. Make sure to ONLY remove and configure MFA options that you haven't moved already.
21.1 There is NO indication on the Okta website (weblogin.usi.edu) for which MFA option is configured on which device. You will have to keep track of this yourself during this whole process.
22. On the Okta website, note another MFA option that you have not moved from your OLD device to your NEW device and choose the next one to walk over to the NEW device.
23.Continue repeating steps 15 through 22 until you have walked over all of your configured MFA apps to your NEW device.